이제 본격 게시판 CRUD 시작!
🖍️ create 글쓰기를 만들어 보자 🖍️
🥑ABoardcadoABoardcadoABoardcadoABoardcadoABoardcadoABoardcadoABoardcado🥑
👩🏻💻 코딩 시작
1. Entity
DB 테이블과 매핑되는 객체
Entity 로 테이블 column이 생성되고 Data가 들어간다

✅
- domain 패키지를 생성하고
- entity 패키지를 생성하고
- 그 안에 Board 클래스를 생성
Board 내용은 아래와 같다
[ Board ]
package com.rim.aboardcado.domain.entity;

import lombok.AccessLevel;
import lombok.Builder;
import lombok.Getter;
import lombok.NoArgsConstructor;
import org.springframework.data.annotation.CreatedDate;
import org.springframework.data.annotation.LastModifiedDate;
import org.springframework.data.jpa.domain.support.AuditingEntityListener;

import javax.persistence.*;
import java.time.LocalDateTime;

@Table
@Getter
@Builder
@Entity
@EntityListeners(AuditingEntityListener.class)
@AllArgsConstructor
@NoArgsConstructor(access = AccessLevel.PROTECTED)
public class Board {

    @Id
    @GeneratedValue(strategy = GenerationType.IDENTITY)
    private Long id;

    @Column(length = 10, nullable = false)
    private String author;

    @Column(length = 50, nullable = false)
    private String title;

    @Column(columnDefinition = "TEXT", nullable = false)
    private String content;

    @CreatedDate
    @Column(updatable = false)
    private LocalDateTime createdDate;

    @LastModifiedDate
    private LocalDateTime modifiedDate;

}
@Table
- Entity와 매핑할 table. 즉 DB에서 schema 를 매핑
- application.properties 에서 Data Source 설정했던 걸 기억하자
- 🥑ABoardcado 는 update로 설정. DB테이블과 매핑 Entity를 비교해 변경사항 수정
- class명과 동일하다면 생략 가능 (위 코드 생략가능)
@Getter
- 변수 값을 호출하는 getter() 메서드 자동 생성
@Builder
- 필드 초기화 작업을 도와줌
- Setter 와 비슷한 역할 this.name = name; 의 기능으로 보면된다
- 위 코드처럼 @NoArgsConstructor 로 생성된 생성자에 설정하는 @Builder 는
- 해당 생성자를 사용하는 Builder만 생성되어, 의미있는 객채만 생성 (무분별X)
@Entity
- JPA가 관리하는 Entity. DB 테이블과 매핑
- 생성자 필수
- SpringBoot에서는 @Autowired, 빈 방식보다 생성자로 빈 주입을 권장
@EntityListeners(AuditingEntityListener.class)
- 해당 class에 Auditing 기능을 포함 선언Audit 은 ‘감시하다’의 뜻으로 시간기록에 대해 자동으로 값을 생성✅ JPA Auditing 활성화는 main class에서 @EnableJpaAuditing 추가 설정 ❗
- @CreatedDate ****, @LastModifiedDate ****의 기능을 사용하기 위해 선언
- JPA에서는 JPA Audit 을 제공하는데
Audit 은 ‘감시하다’의 뜻으로 시간기록에 대해 자동으로 값을 생성
@CreatedDate ****, @LastModifiedDate ****의 기능을 사용하기 위해 선언
✅ JPA Auditing 활성화는 main class에서 @EnableJpaAuditing 추가 설정 ❗

@NoArgsConstructor(access = AccessLevel.PROTECTED)
- 파라미터가 없는 기본 생성자 생성
- *PROTECTED *****무분별한 생성을 막기 위함
@AllArgsConstructor
- 모든 필드 값을 파라미터로 받는 생성자 생성
- @Builder를 사용할 때, 생성한 생성자가 아무것도 없다면→ 위 코드는 @NoArgsConstructor 기본생성자를 넣었기때문에 명시해줘야 함
- @AllArgsConstructor(access = AccessLevel.PACKAGE)가 자동 적용
@Id
- JPA Entity 객체의 식별자로 사용
@GeneratedValue (strategy = GenerationType.AUTO)
- 기본 key 생성을 DB에 위임 ( = AUTO_INCREMENT )
- DB 마다 IDENTITY, *SEQUENCE* 등 **맞는 방식으로 해야하는데 AUTO는 알아서 적합배정
@Column
- 객체를 DB table의 컬럼에 매핑. nullable, unique, length 등 속성 입력가능
- 생략가능 (Entity 자체를 테이블로 보고 필드를 Column으로 생성해준다.
@CreatedDate , @LastModifiedDate
- JPA에서 생성,수정된 시간 정보 자동 생성
2. Application
✅ @EnableJpaAuditing 추가하여 JPA Auditing 활성화
[ AboardcadoApplication ]
package com.rim.aboardcado;

import org.springframework.boot.SpringApplication;
import org.springframework.boot.autoconfigure.SpringBootApplication;
import org.springframework.data.jpa.repository.config.EnableJpaAuditing;

@EnableJpaAuditing
@SpringBootApplication
public class AboardcadoApplication {

	public static void main(String[] args) {
		SpringApplication.run(AboardcadoApplication.class, args);
	}
}
3. Repository
Data를 DB에 조작하고 조회한다
JpaRepository를 상속받으면 JPA 제공 메서드 save()가 create를 손쉽게 해준다

✅
- repository 패키지를 생성하고
- 그 안에 BoardRepository 인터페이스 생성
BoardRepository 내용은 아래와 같다
[ BoardRepository ]
package com.rim.aboardcado.domain.repository;

import com.rim.aboardcado.domain.entity.Board;
import org.springframework.data.jpa.repository.JpaRepository;

public interface BoardRepository extends JpaRepository<Board, Long> {

}
interface 로 생성하며, JpaRepository 를 상속받고
매핑할 < Entity, Id type > Board 엔티티와 매핑하고 id의 타입인 Long 적어주기
JPA를 상속하면 CRUD 관련 쿼리메소드가 지원
findById(id); findByEmail(email); 등
‘ By ‘ 를 기준으로 Where절에 대응하여
메소드명을 해석해 처리하기 때문에 상속하면 끝 🙌
나중에 검색, 페이징 등 기능 추가 작성도 가능
@Query 쿼리 작성도 가능
4. DTO
Data Access Object
Controller와 Service 사이에서 data를 주고받는 역할
DB와 주고받는 객체인 Entity와 유사한데
그 이유는 Entity는 직접 사용하면 안되기 때문에
Entity를 모두 Dto로 변환해 사용하기 때문에 비슷하다
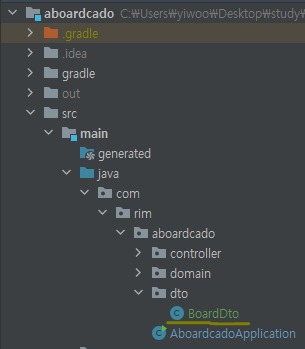
✅
- dto 패키지를 생성하고
- 그 안에 BoardDto 클래스 생성
BoardDto 내용은 아래와 같다
[ BoardDto ]
package com.rim.aboardcado.dto;

import com.rim.aboardcado.domain.entity.Board;
import lombok.*;

import java.time.LocalDateTime;

@Builder
@Getter
public class BoardDto {
    private Long id;
    private String author;
    private String title;
    private String content;
    private LocalDateTime createdDate;
    private LocalDateTime modifiedDate;

    public Board toEntity() {
        Board build = Board.builder()
                .id(id)
                .author(author)
                .title(title)
                .content(content)
                .build();
        return build;
    }
}
@Builder
- 메소드(), 생성자에 붙여주면 파라미터를 활용해 빌더 패턴을 자동 생성 (setter와 비슷)
- class 레벨에 붙여주면 모든 요소를 받는 package-private 생성자 자동생성되며즉 class레벨도 결국 생성자 레벨로 변환되어 동작한다
- → 이 생성자에 @Builder 를 사용한것과 동일하게 작동
위 코드에서 @Builder 를 사용하지 않았다면
- class level에 @Setter 추가하거나
- @NoArgsConstructor 기본 생성자 , @Builder 빌드패턴 추가
@Builder
    public BoardDto(Long id, String author, String title, String content, LocalDateTime createdDate, LocalDateTime modifiedDate) {
        this.id = id;
        this.author = author;
        this.title = title;
        this.content = content;
        this.createdDate = createdDate;
        this.modifiedDate = modifiedDate;
    }
❗ 변수가 추가되거나 <Optional>한 속성들을 받아야할 때 ❗
생성자, 수정자패턴은 수정을 거쳐야하지만
빌드패턴은 유연하게 객체의 값을 설정해주기 때문에 기존코드에 영향을 주지 않는다
toEntity()
- BoardDto 에서 빌더 패턴사용해 Board Entity에 data 주입
5. Service
controller는 “/” 로 매핑됨에 따라 Service의 비즈니스 로직을 호출하는데
Service는 Repository를 통해 data를 조작, 조회하여 요청 처리 로직을 만든다
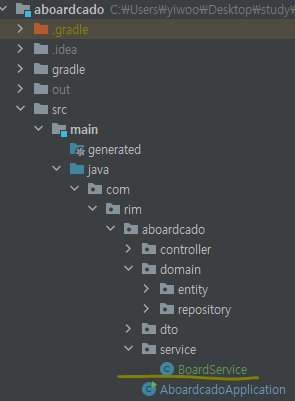
✅
- service 패키지를 생성하고
- 그 안에 BoardService 클래스 생성
BoardService 내용은 아래와 같다
[ BoardService ]
package com.rim.aboardcado.service;

import com.rim.aboardcado.domain.repository.BoardRepository;
import com.rim.aboardcado.dto.BoardDto;
import lombok.RequiredArgsConstructor;
import org.springframework.stereotype.Service;

import javax.transaction.Transactional;

@AllArgsConstructor
@Service
public class BoardService {
    private BoardRepository boardRepository;

    @Transactional
    public Long savePost(BoardDto boardDto) {

        return boardRepository.save(boardDto.toEntity()).getId();
    }
}
@Service
- Service 비즈니스 로직임을 선언
- Controller에서 로직을 호출하여 사용
@AllArgsConstructor
- 모든 필드값을 포함한 생성자 생성
@Transaction
- 모든 작업들이 성공적으로 완료되어야 작업 묶음의 결과를 적용
- 실행, 종료(commit), 예외(rollback)class, method() 에 적용이 가능하고, method() (소분류)가 우선 적용
- 작업 도중 오류가 발생했을 때 이전 모든 작업들이 성공하였더라도 작업 전 시점으로 되돌린다
- JPA Service에서 필수
savePost()
- save() 는 JPA에서 제공하는 메소드
- BoardDto의 toEntity() 메소드를 이용해 Entity에 저장 후, 해당 글 Id값을 받아옴
6. Controller
클라이언트의 HTTP 요청이 진입하는 지점
요청에 따른 mapping으로
Service 로직을 호출하고 서버에서 처리된 결과를 view와 함께 전달해준다

✅
- controller 패키지를 생성하고
- 그 안에 BoardController 클래스를 생성
[ BoardController ]
package com.rim.aboardcado.controller;

import com.rim.aboardcado.dto.BoardDto;
import com.rim.aboardcado.service.BoardService;
import lombok.RequiredArgsConstructor;
import org.springframework.stereotype.Controller;
import org.springframework.web.bind.annotation.GetMapping;
import org.springframework.web.bind.annotation.PostMapping;
import org.springframework.web.bind.annotation.RequestMapping;

@AllArgsConstructor
@Controller
public class BoardController {

    private BoardService boardService;

    @GetMapping("/post")
    public String post() {
        return "board/post";
    }

    @PostMapping("/post")
    public String write(BoardDto boardDto) {
        boardService.savePost(boardDto);
        return "redirect:/post";
    }
}
@Controller
- Controller 임을 선언
@GetMapping @PostMapping
- Controller에 매핑하는 URL 중 method=GET, POST 로 요청된 값만 매핑
write()
- boardDto값을 boardService에 정의된 savePost()에 넣어서 호출
- return “board/post”; Thymeleaf에서
- prefix는 classpath:/templates/
- subfix는 .html
- 이 것이 디폴트이기에 [ templates > board > post.html ]을 리턴
- redirect
- 새로고침 버튼 시 가장 최근 요청을 한번 더 실행한다
- 이때 form이 재제출되는 것을 막기 위해 redirect로 경로를 다시 접속
- 이렇게 하면 새로고침 시 경로 접속이 재실행 된다
글쓰기가 완료되면 List로 넘어가게 할거지만
📋List는 다음에 만들기에 우선 post로 리다이렉트
View 를 만들 차례!! 거의 다왔다 헥헥
Thymeleaf 템플릿으로 layout 공통을 통일시킬 건데
jsp로 치면 include 방식으로 header , footer등을 집어 넣게 하겠다
post.html을 빠르게 만들어 보자잇 💨
7. Layout, Header, Footer
✅
resources 에서 리소스를 읽어들이는데 아래 사진처럼 구조를 생성
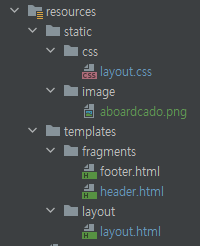
static 은 css , image 등
변함없는 것 들을 정의를 해두고
templates 은 view 화면단이 들어간다
Thymeleaf 템플릿 엔진을 이용하며
layout, fragment 등 공통 page를 조립식으로 넣어 사용할 것이다
✅ gradle 에 아래 dependencies가 꼭 추가되어있어야함 ❗
💡 implementation 'org.springframework.boot:spring-boot-starter-thymeleaf'
implementation 'nz.net.ultraq.thymeleaf:thymeleaf-layout-dialect'
[ layout.css ]
html {
    position: relative;
    min-height: 100%;
    margin: 0;
}
body {
    min-height: 100%;
}
.footer {
    position: absolute;
    left: 0;
    right: 0;
    bottom: 0;
    width: 100%;
    padding: 15px 0;
    text-align: center;
}
.content{
    margin-bottom:100px;
    margin-top: 50px;
    margin-left: 200px;
    margin-right: 200px;
}
[ layout.html ]
<!DOCTYPE html>
<html xmlns:th="http://www.thymeleaf.org"
      xmlns:layout="http://www.ultraq.net.nz/thymeleaf/layout">
<head>
    <meta charset="UTF-8">
    <title>Title</title>

    <!-- CSS only -->
    <link rel="stylesheet" href="https://stackpath.bootstrapcdn.com/bootstrap/4.5.2/css/bootstrap.min.css">
    <link th:href="@{/css/layout.css}" rel="stylesheet">

    <!-- JS, Popper.js, and jQuery -->
    <script src="https://code.jquery.com/jquery-3.5.1.min.js"></script>
    <script src="https://cdn.jsdelivr.net/npm/popper.js@1.16.1/dist/umd/popper.min.js"></script>
    <script src="https://stackpath.bootstrapcdn.com/bootstrap/4.5.2/js/bootstrap.min.js"></script>

    <th:block layout:fragment="script"></th:block>
    <th:block layout:fragment="css"></th:block>

</head>
<body>

<div th:replace="fragments/header::header"> </div>

<div layout:fragment="content" class="content"> </div>

<div th:replace="fragments/footer::footer"> </div>

</body>
</html>
✅ check ✅
<html xmlns:th="http://www.thymeleaf.org"> xmlns:layout="http://www.ultraq.net.nz/thymeleaf/layout">
- Thymeleaf 사용 선언
<div th:replace="fragments/header::header">
- header.html 로 치환
<div layout:fragment="content">
- view html 들이 작성될 자리
<div th:replace="fragments/footer::footer">
- footer.html 로 치환
[ header.html ] - 공통 fragment
<!DOCTYPE html>
<html xmlns:th="http://www.thymeleaf.org">

<div th:fragment="header">
    <nav class="navbar navbar-expand-sm bg-success navbar-dark">
        <img src="/image/aboardcado.png" width="25px" alt="logo" href="/">

        <button class="navbar-toggler" type="button" data-toggle="collapse"
                data-target="#navbarTogglerDemo03" aria-controls="navbarTogglerDemo03"
                aria-expanded="false" aria-label="Toggle navigation">
            <span class="navbar-toggler-icon"></span>
        </button>
        <a class="navbar-brand" href="/">ABoardcado</a>

        <div class="collapse navbar-collapse" id="navbarTogglerDemo03">
            <ul class="navbar-nav mr-auto mt-2 mt-lg-0">
                <li class="nav-item">
                    <a class="nav-link" href="/post">글쓰기</a>
                </li>
                <li class="nav-item">
                    <a class="nav-link" href="/">리스트</a>
                </li>
            </ul>
        </div>
    </nav>
</div>
</html>
✅ check ✅
<img src="/image/aboardcado.png" width="25px" alt="logo" href="/board">
header 앞부분에 Logo 이미지를 넣었는데
[ resource>static>image ] 에 이미지를 넣고 .png 파일명을 치환해 입력해주어야한다
.jpg 를 넣었다면 파일명.jpg
Thymeleaf에서 img를 읽지 못하면 alt값을 뱉기도 하지만 error가 나버릴 때도 있다ㅜ
[ footer.html ] - 공통 fragment
<!DOCTYPE html>
<html xmlns:th="http://www.thymeleaf.org">
<div class="footer" th:fragment="footer">
    <footer class="page-footer font-small cyan darken-3">
        <div class="footer-copyright text-center py-3">
            2022 ABoardcado ⓒ Develothy
        </div>
    </footer>
</div>
</html>
❗ layout 설정 완료 ❗
script, header, footer, content 등 각자 구역을 나누었기 때문에
이후 view 페이지는 <div layout:fragment="content"> 안에 작성
< nav bar, font-small 등 class name은 bootstrap을 위한 것 >
8. post.html

✅
- templates 안에 board 디렉토리 생성
- 그 안에 post.html 글쓰기 페이지 생성
[ post.html ]
<!DOCTYPE html>
<html xmlns:th="http://www.thymeleaf.org"
      xmlns:layout="http://www.ultraq.net.nz/thymeleaf/layout"
      layout:decorate="~{layout/layout}">

<div layout:fragment="content">
    <div class="container">
        <form action="/post" method="post">
            <div class="form-group row">
                <label for="inputTitle" class="col-sm-2 col-form-label"><strong>제목</strong></label>
                <div class="col-sm-10">
                    <input type="text" name="title" class="form-control" id="inputTitle" />
                </div>
            </div>
            <div class="form-group row">
                <label for="inputAuthor" class="col-sm-2 col-form-label"><strong>작성자</strong></label>
                <div class="col-sm-10">
                    <input type="text" name="author" class="form-control" id="inputAuthor" />
                </div>
            </div>
						<div class="form-group row">
                <label for="inputContent" class="col-sm-2 col-form-label"><strong>내용</strong></label>
                <div class="col-sm-10">
                    <textarea type="text" name="content" class="form-control" id="inputContent"></textarea>
                </div>
            </div>
            <div class="row">
                <div class="col-auto mr-auto"></div>
                <div class="col-auto">
                    <input class="btn btn-success" type="submit" role="button" value="글쓰기" />
										<a class="btn btn-danger" th:href="@{'/'}" role="button">취소</a>
                </div>
            </div>
        </form>
    </div>
</div>
</html>
✅ check ✅
<html xmlns:th="http://www.thymeleaf.org
xmlns:layout="http://www.ultraq.net.nz/thymeleaf/layout"
layout:decorate="~{layout/layout}">
- Thymeleaf 사용 선언
- layout을 사용하기 위해 layout : decorate 추가됨
글쓰기는 서버로 값을 넘기기 때문에 form을 사용
취소는 List로 돌아가는 것 외의 작업이 없기 때문에 <a href>로 단순 이동
글쓰기는 아직 서버에서 값을 받고있지는 않기 때문에
표현식이 없어서 크게 일반 html vs Thymeleaf 를 느낄 건 없다
🤤 Create 글쓰기 드디어 완성!!!
#1편부터 지금까지 똑같이 진행했다면 아래와 같이 나온다 💯

6. header에서 🥑Logo 이미지는 제공하지 않았다
✅ [ resource>static>image ] 에 이미지를 넣고 / header.html - ooo.png 파일명 치환해 입력
그런데… 🤔
submit 된거 맞아? 뚜둥❕❕
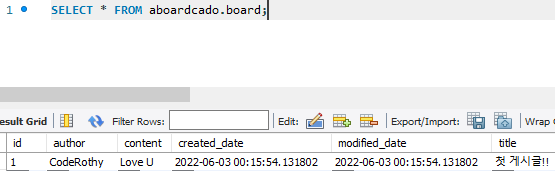
우린 아직 글들을 확인할 수 있는 로직과 view가 없기 때문에,,ㅋ
MySQL Workbench 로 들어가서 확인 해보면 table이 생성되고 Data가 확인된다 굿👏
와 정말 긴 여정이드아
다음편에서는 테이블에 있는 데이터들을 list로 볼 수 있도록
list 로직과 view를 만들어 보ㅏ야지
그럼 이만 👋
'Project > 🥑JPA + SpringSecurity 게시판' 카테고리의 다른 글
| [JPA + SpringSecurity 게시판] #6 글 리스트 만들기 (0) | 2022.04.24 |
|---|---|
| [JPA + SpringSecurity 게시판] #5 @Valid 유효성 체크하기 (0) | 2022.04.19 |
| [JPA + SpringSecurity 게시판] #3 DB연동 (MySQL) (0) | 2022.04.07 |
| [JPA + SpringSecurity 게시판] #2 프로젝트 생성 (0) | 2022.03.28 |
| [JPA + SpringSecurity 게시판] #1 프로젝트 요구사항 (0) | 2022.03.23 |


